- Related articles
- Apply to 1000BASE-LX Standard Optical Transceiver Models
- Optical Transceivers for Cisco SRW2024-K9-UK Switch
- All Cisco QSFP-40G-CSR4's information (List price, Specs, Datasheet PDF, Compatibility mat
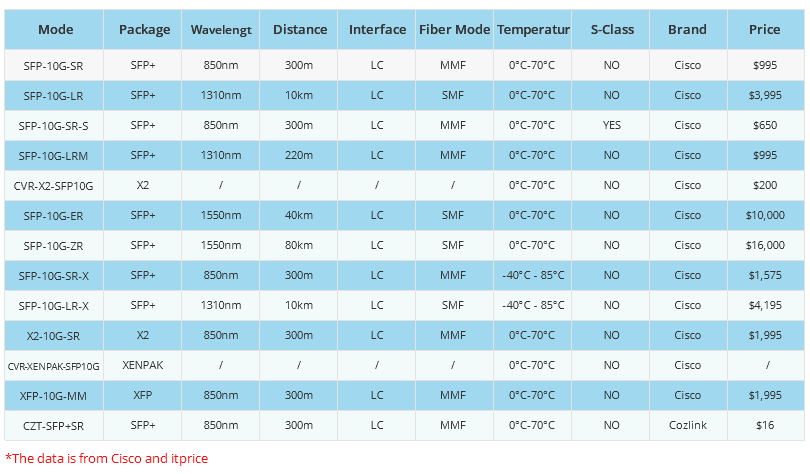
- Serval Cisco Fiber Optic Transceivers
- Optical Transceivers for Cisco WS-C3650-24PWD-S Switch
- Optical Transceivers for Cisco N3K-C3064PQ-10GX Switch
- Used in 10GBASE-USR Standard Optical Transceiver Models
- Optical Transceivers for Cisco WS-C2960S-48FPD-L Switch
- The compatibility and difference between PCI PCI-X and PCI-E
- Optical Transceivers for Cisco SF350-48P-K9-EU Switch


The MERCURY switch is a powerful tool used by many IT professionals for network monitoring and management. It allows you to monitor and manage your network by collecting and analyzing data on network activity. One of the key functions of the MERCURY switch is its ability to store configurations for the devices on the network. This is essential for effective network management, but sometimes it is necessary to delete configurations. In this article, we will explore how to delete configuration on MERCURY switch.
Before we delve into the details, it is important to note that deleting configurations on MERCURY switch can be risky. If you delete the wrong configuration or accidentally delete a critical configuration, it can lead to network downtime and even data loss. Therefore, it is essential to be cautious and follow the steps carefully.
I. Solution 1:
There are three main ways to delete configurations on MERCURY switch:
1. Deleting specific configurations using the CLI
2. Deleting all configurations using the CLI
3. Deleting configurations using the web interface
Let's take a closer look at each of these methods.
1. Deleting specific configurations using the CLI
The MERCURY switch CLI (Command Line Interface) provides a powerful and flexible way to manage configurations. To delete a specific configuration using the CLI, follow these steps:
Step 1: Log in to the MERCURY switch using the CLI.
Step 2: Enter the "configuration mode." This can be done by typing "configure terminal" or "conf t" and pressing Enter.
Step 3: Identify the configuration you want to delete using the "show running-config" command.
Step 4: Enter the "no" command followed by the specific configuration you want to delete. For example, if you want to delete a VLAN (Virtual LAN) configuration, you would enter "no vlan 10" (assuming VLAN 10 is the one you want to delete).
Step 5: Verify that the configuration has been deleted using the "show running-config" command.
2. Deleting all configurations using the CLI
If you want to delete all configurations on the MERCURY switch, you can use the "erase startup-config" command. This command clears the entire configuration memory on the switch. Follow these steps to erase all configurations using the CLI:
Step 1: Log in to the MERCURY switch using the CLI.
Step 2: Enter the "enable" command followed by the "erase startup-config" command.
Step 3: When prompted to confirm, type "yes" and press Enter.
Step 4: Reload the switch to restart it with the erased configuration.
Step 5: Verify that the configuration has been erased by entering the "show running-config" command.
3. Deleting configurations using the web interface
The MERCURY switch also provides a web interface for managing configurations. To delete configurations using the web interface, follow these steps:
Step 1: Log in to the MERCURY switch using a web browser.
Step 2: Navigate to the "Configuration" section of the web interface.
Step 3: Identify the configuration you want to delete and select it.
Step 4: Click the "Delete" button.
Step 5: Confirm that you want to delete the configuration.
Step 6: Verify that the configuration has been deleted by refreshing the web interface.
In conclusion, deleting configurations on MERCURY switch can be a complex and risky process. It is essential to understand the risks involved and follow the steps carefully. Whether you use the CLI or the web interface, it is crucial to verify that the configuration has been successfully deleted. By following these steps, you can effectively manage your network and keep it running smoothly.
II. Solution 2:
How to factory default a Mercury LP series controller
This procedure will bulk erase the configuration database. The bulk erase function can be used for the following purposes:
· To erase all configuration and cardholder database data.
· To recover from a corrupted database.
Please note this procedure will also erase all network settings on the panel
Prerequisites
· Physical access to the panel
Preliminary Steps
1. Locate all dip switches and set them to OFF
2. Disconnect power from the panel
Locate Dip Switches and Status LEDs

LP1501

LP1502

LP2500
Procedure
1. Set dip switches 1&2 to ON, 3&4 OFF
2. Apply power to the panel. LED 1 ON for about 15 seconds while the panel boots up.
3. After the panel boots up, watch for LEDs 1 & 2 and 3 & 4 to alternately flash at a 0.5 second rate.
Within 10 seconds after the above pattern starts, change switches 1 or 2 to OFF. If these switches are not changed, the board board will power up using the OEM default communication parameters.
4. LED 2 will flash indicating that the configuration memory is being erased.
5. Full memory erase takes up to 60 seconds, usually a lot less.
6. When complete, only LEDs 1 & 4 will flash for about 3 seconds.
7. The panel board will complete its initialization in 2 seconds after LEDs 1 & 4 stop flashing.
III. Solution 3:
Sometimes a switch needs to change its usage scenario or be reconfigured, and in these situations, restoring it to factory settings is necessary. When the switch can be accessed via console login, there are two ways to restore it to its factory default settings.
Configuration Steps:
Method One:
Use the "reset save" command to clear the configuration.
Restart the switch.
Method Two:
Delete the "startup.cfg" file of the switch.