


- Related articles
- Optical Transceivers for Cisco WS-C4948-E Switch
- What Is GJYXCH Fiber Optic Cable?
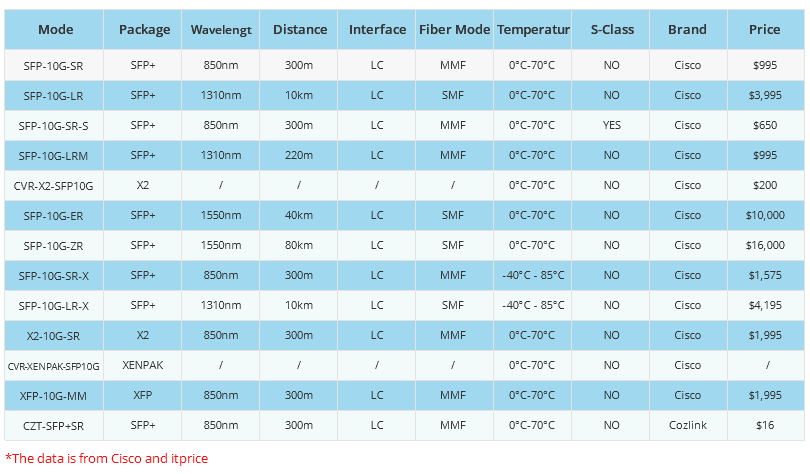
- All Cisco SFP-10G-BXU-I's information (List price, Specs, Datasheet PDF, Compatibility mat
- All Cisco SFP-10G-LR-X's information (List price, Specs, Datasheet PDF, Compatibility matr
- Optical Transceivers for Cisco SF200-24FP-EU Switch
- All Cisco WS-G5483's information (List price, Specs, Datasheet PDF, Compatibility matrix)
- Optical Transceivers for Cisco WS-C3560V224PSS-RF Switch
- Used in 10GBASE-USR Standard Optical Transceiver Models
- Cisco XFP vs. SFP vs. SFP+
- What Is Network Interface Card Architecture?


Introduction
At one time, user may decide to terminate the fiber optic cable usage. Probably the user doesn’t need the fiber optic cable services anymore or want to move to a different place. Therefore, there is need to learn different professional methods used to terminate Fiber Optic Cable services. As at now, there are numerous methods used to terminate fiber optic cable. Consequently, there is a procedure of terminating fiber optic cable as outlined below.
Step 1: The tools you will need:
• Fiber stripper
• Ruler
• Marker
Step 2: Measure from the end of the fiber to 40 mm and mark the cable.

Step 3: Slide the strain-relief boot onto the cable.

Step 4: Make sure the stripper’s cutting face is clean. Use the front, large V-notch on the cable stripper to remove the 900-micron tight buffer.

Step 5: Carefully clamp down on the cable halfway down from the mark you made.

Step 6: Keeping the pressure light, carefully slide the jacket off of the fiber. Be careful to avoid breaking the fragile glass fiber. Repeat step to remove the remaining 20 mm of jacket.

Step 7: Carefully remove any of the leftover 250-micron coating (notice the white film on the fiber) using the smaller, back V-notch on the tool.
Step 8: Clean the bare fiber with two passes of a fiber wipe dampened with fiber optic cleaning fluid. Do not touch the bare fiber after cleaning it.

Step 9: Ensure that both clamps (C) are clean and free of fiber. Squeeze buttons A and B at the same time to open clamps.
 are clean and free of fiber.jpg "Ensure that both clamps (C) are clean and free of fiber")
Step 10: Place fiber in the slot so the bare fiber is in the V-groove, the buffer or coating is aligned with the alignment mark, and the fiber rests under the tab. Fully release button B then button A. Ensure both the bare and coated fiber is secured by the clamps.

Step 11: Slowly turn the knob 360 degrees to cut the fiber.

Step 12: Squeeze button A, remove the scrap fiber and place it in the scrap fiber bin.

Step 13: While holding onto the fiber, squeeze button B and remove the cleaved fiber.

Step 14: Measure and mark an additional 11 mm on the fiber jacket.

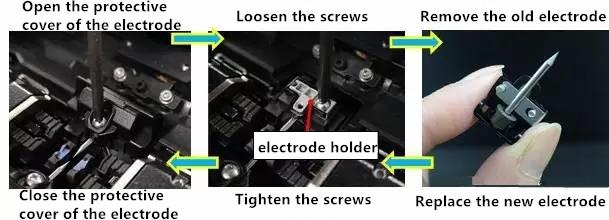
Step 15: Ensure the components are in the starting position. If not, slide the VFL coupler back toward the cover hinge until it locks. Verify the load button is released and the connector cradle is against the travel stop. Depress the reset button to return the wrench to the start position.

Step 16: Ensure the correct ferrule adapter is installed. Switch the power on. If the power light flashes or does not glow, the batteries need to be replaced.

Step 17: Remove the dust cap from connector and squeeze the load button to move the connector cradle away from the wrench.

Step 18: With the connector oriented up, load the connector into the tool by inserting it (lead-in tube first, into the wrench).
Slowly release the load button while guiding the connector into the connector cradle.

Step 19: Slide the VFL coupler down until the ferrule adapter is seated on the connector.

Step 20: Close the cover and check for the error light. If the error light remains off, there are no problems.Insert the cleaved fiber into the back of the lead-in tube.
Insert the fiber until you feel it firmly stop against the fiber stub. The visual mark should be within 2 mm of the lead-in tube.

While maintaining enough inward pressure, squeeze the CAM button in until it locks. Check the termination lights. If the green light is illuminated, the termination was successful. If the red light is illuminated, press the reset button, remove the fiber and repeat the termination process.
Step 21: Turn the crimp knob 180 degrees in either direction to crimp and lock the connector into the fiber.

Step 22: Open the cover and slide the VFL coupler back into its starting position. Slightly squeeze the button to remove the connector.
Ensure the clear ferrule dust cap is installed. Slide the boot up the back of the connector until it reaches the cam.

Step 23: Install the outer shroud by lining up the date code with the key-side of the outer shroud. Using the boot, push the assembly into the outer shroud until it snaps into place.

Step 24: The fiber connector is completed.

Conclusion
If you want to terminate fiber optic cable, keenly follow the above procedure for a professional termination. The procedure will take you through 24 steps that you need to adhere to in termination process.