


- Related articles
- All Cisco SFP-10G-ER's information (List price, Specs, Datasheet PDF, Compatibility matrix
- All Cisco DWDM-SFP10G-50.12's information (List price, Specs, Datasheet PDF, Compatibility
- How to Distinguish Coaxial Cable and Fiber Optic Cable?
- What is Linux PAM module?
- The Difference between SATA, PCIe and NVMe
- All Cisco 15454-GBIC-LX's information (Specs, Datasheet PDF, Compatibility matrix)
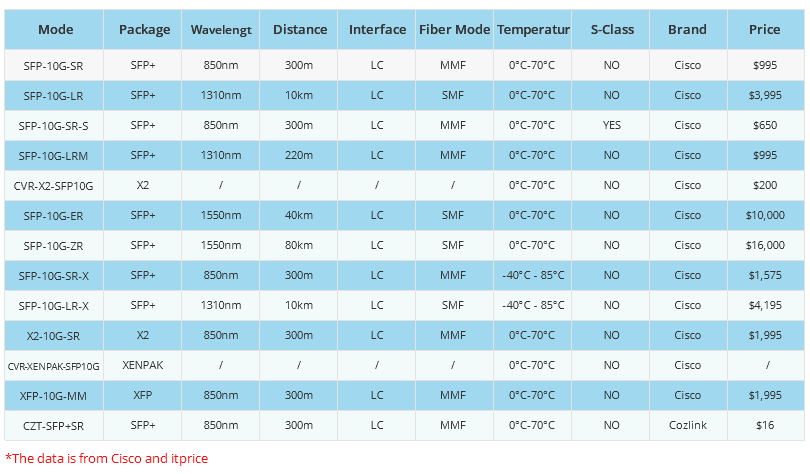
- Optical Transceivers for Cisco N7K-F348XP-25= Switch
- All Cisco GLC-LH-SMD's information (List price, Specs, Datasheet PDF, Compatibility matrix
- The difference between XENPAK and X2
- Overview Cisco GLC-LH-SM Of SFP Transceiver Module
Recommend tag
You can learn about us through other platforms


How to Configure the Dual Ethernet Adapter?
2017-02-16
All of today's motherboards ship with at least one gigabit Ethernet port. Some premium boards come with two. Of course, you can always add more by installing add-in NICs, and there are motherboards with more than two, but for the sake of this article we're referring to consumer motherboards.
So, what exactly is link aggregation? In a nutshell, link aggregation (or trunking), is the fine, delicate art of combining two or more physical Ethernet links into a single logical link. So if two 1Gb/s ports were aggregated, you would get a total aggregated bandwidth of 2Gb/s. Note that we use the phrase "aggregated bandwidth."

Dual Ethernet Adapter
The Dual Port Gigabit Ethernet Adapter lets you add two Gigabit Ethernet ports to your laptop or Ultrabook computer through a single USB 3.0 port, and features an integrated USB 3.0 pass-through port that keeps your USB port available for use with external storage or other peripherals. Each RJ45 port supports 10/100/1000 Mbps Ethernet and is fully compatible with IEEE 802.3i/u/ab standards.
This 2-port USB LAN adapter is a versatile solution for connecting to two separate physical networks simultaneously; leveraging the 5 Gbps speed of USB 3.0 to provide dedicated gigabit bandwidth to each port. The dual USB NIC is also ideal for providing dedicated physical network interfaces to virtual machine configurations, great for IT administrators that require dual-homed or multi-homed host systems.
How to Configure the Dual Ethernet Adapter
In order to use both Ethernet ports on a dual port controller, you must configure Ethernet Port 2 with a static IP address which resides in a different subnet than Ethernet port 1. For more information on subnets, see the Related Links section below.
Configure Port 1 for DHCP
Connect the controller via Ethernet port 1 to the switch/hub with access to the DHCP server.
- Enable the IP Reset DIP switch on the controller.
- Reboot the controller by pressing RESET.
- Wait for the controller to reboot and disable the IP Reset DIP switch.
- Open Measurement & Automation Explorer (MAX).
- Locate the controller under Remote Systems in MAX and select it.
- Navigate to the Network Settings tab (located at the bottom of the main window in MAX).
- In the Ethernet Adapter eth0 (Primary) section select DHCP or Link Local in the Configure IPv4 Address field (see below).
- Click Save.
- Click yes to reboot the controller.
Configure Port 2 (eth1)
Ethernet port 2 must be configured with a static IP that does not reside in the same subnet of Ethernet port 1.
- Connect the dual port controller via Ethernet port 1 to the network.
- Open Measurement & Automation Explorer (MAX).
- Locate the controller under Remote Systems in MAX and select it.
- Navigate to the Network Settings tab.
- In the Ethernet Adapter eth1 section select TCP/IP Network in the Configure IPv4 Address field.
- Enter the desired IP address in the IPv4 Address field.
- Enter the desired subnet mask in the Subnet Mask field.
- Click Save.
- Click yes to reboot the controller.
Summary
In a typical setup where a PC has 2 NICs, one is setup as the connection to the internet and the other can be used to interface with any device that is Ethernet capable (home video cameras, alarm systems, home control systems, etc). However, the other NIC can be connected to another network.

TECHNICAL SUPPORT
Get solutions or consultation from the technical team.