- Related articles
- Optical Transceivers for Cisco WS-C2960S-F48LPS-L Switch
- Optical Transceivers for Cisco SF350-48-K9-EU Switch
- Optical Transceivers for Cisco WS-C2960+48TC-L Switch
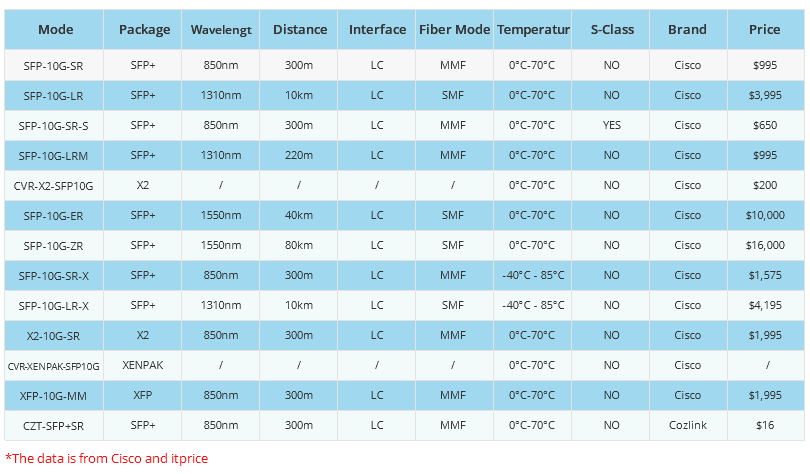
- The datasheet of Cisco SFP-10G-SR
- 10GBASE-T or SFP Plus
- Optical Transceivers for Cisco IE-2000-4TS-G-L Switch
- All Cisco SFP-OC12-SR's information (List price, Specs, Datasheet PDF, Compatibility matri
- Optical Transceivers for Cisco ME-3400-24TS-A Switch
- Optical Transceivers for Cisco N9K-C9372PX-E= Switch
- Optical Transceivers for Cisco WS-C2960S-F48FPS-L Switch


Dual-NIC deployments provide a simpler network configuration as well as better security. Dual-NIC deployments are more secure, because ports between a DMZ and a private network do not need to be opened for Desktop Server. Dual-NIC deployments allow you to bridge the internal firewall. External client access is only granted to the external NIC.

Dual NIC Card
The Dual-Port Gigabit Network Card lets you add two gigabit Ethernet ports to a client, server or workstation through a single PCIe slot. Each port provides 10/100/1000 Mbps capable Ethernet and is fully compatible with IEEE 802.3/u/ab standards. Suitable for any standard PCI Express-enabled system, the 2-port Ethernet card supports full-duplex flow control for maximum data transfer speeds of up to 2000 Mbps - an ideal 2-port NIC for setting up dual-homed, or multi-homed host configurations providing added security to corporate networks.
The dual-port server adapter is compliant with the PCIe 2.0 standard and features support for Jumbo Frames and 802.1q VLAN tagging as well as Wake on LAN (WoL). The adapter includes an optional low-profile / half-height bracket that can be used for installation into a standard or small form-factor computer chassis.
Reduce PCIe Bus Latency
The latency values can be read easily with the 'lspci -v' command, and set easily with the 'setpci' command. These commands are present on most Linux installations. The syntax for setting the value is:
setpci -v -s xx:yy.z latency_timer=[n]
Where xx:yy.z are the first numbers listed by lspci, and n is a hex value between 0 and ff (setpci will round down ff, which is actually 255, to the required 248).
Remember that these changes will not persist across a re-boot, and you will probably want to put the setpci commands in a script that runs at boot time, unless your BIOS permits you to set them outside of the OS.
Configure Settings for Dual NIC Deployments
Below are the step by step instructions of how to configure a network interface address for the Desktop Server.
- In the Desktop Server Administration web user interface, either click Status in the sidebar, and then click the link showing the Desktop Server IP address.
- Enter the IP address that the Desktop Server must use to communicate with various servers.
- For secure multiple NIC deployments, enter a DNS name in the Public Address field.
- Select the maximum call rate from the list.
- Click OK or Apply.
Summary
The Desktop Server can have multiple Network Interface Cards (NICs). Depending on the deployment and network configuration, you might want to control which NIC is used for various server communications.
In secure multiple NIC deployments you can use a NIC configured behind the firewall to communicate with various servers, while using another NIC to which the external Desktop Clients connect. You must configure the Desktop Server network interface address to represent the NIC behind the firewall.