


- Related articles
- What is a transceiver module?
- Optical Transceivers for Cisco WS-C2960X-24TS-L Switch
- Apply to 100BASE-BX-D Standard Optical Transceiver Models
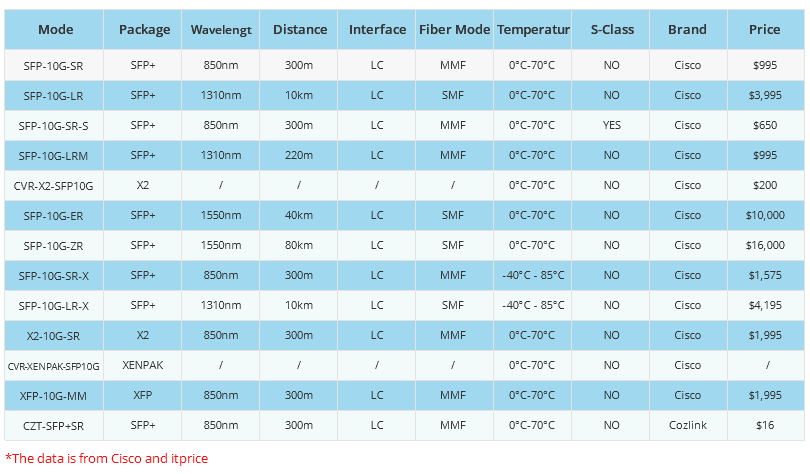
- All Cisco SFP-10G-SR’s information (Overview, List price, Specs, Datasheet PDF, Compatibil
- What Is GJFJV Fiber Optic Cable?
- Optical Transceivers for Cisco WS-C3560V2-24TS-S Switch
- Optical Transceivers for Cisco WS-C3650-24PD-S Switch
- Optical Transceivers for Cisco SG102-24-UK Switch
- Optical Transceivers for Cisco WS-C3560E-12D-E Switch
- All Cisco QSFP-40G-LR4-S’s Information (Overview, Features, Datasheet PDF, Price, Specific


In this article, you will learn how to install a NIC card where NIC stands for Network Interface Card. This card is found on the motherboard of a computer and as its name says, it is used to connect to the internet.

What is the NIC?
A network interface card (NIC) is a circuit board or card that is installed in a computer so that it can be connected to a network. A network interface card provides the computer with a dedicated, full-time connection to a network.
Installing a NIC card requires you to have some basic knowledge on computer component and does not necessarily need you to be a computer whiz to do the job. To install the Network Interface Card follow through the following steps to successfully install your card.
1. Unplug the power cable on your computer power supply.
2. Open your PC case, there are usually two screws at the back of your PC, unscrew it and set aside the screw. Some pc case don’t have screws to remove the cover you just have to slide the cover to open, refer to your PC case manual on how to remove the cover of your PC.
3. Discharge yourself from any static charge that my damage the component before touching any pc component. You can do this by using an anti-static wrist strap clipping it to the computer casing metallic part or if you don't have this anti-static wrist strap you can touch any non-painted metallic part of the computer casing to remove any static charge from your body before proceeding to the installation of the component. When working with pc component such as network interface card always avoid touching the golden pins of the cards or the IC chips pins.
4. Find an available PCI slot on your motherboard. PCI slot can be easily distinguished over PCI-E since PCI slot are shorter in length than PCI-E slots except for PCI-E 1x slot which is shorter than PCI slot. Refer to the image below.

5. Install the NIC card by aligning the guide notches with the PCI slot and pressing the card gently till it sit firmly on the PCI slot, you’ll know if it is sited well if you can’t see the pins of the NIC on the PCI slot.

6. Secure the card by using a single screw, screwing the card bracket firmly to the computer casing.
7. Inspect the card if it moves, a well sited card should not move when you try to move them. A not properly sited card may damage the card when you power on your computer.
8. Plug in the power cord to the power supply and power on your computer.
9. Wait for windows to load, a “new device detected” message by windows should appear and it will install the necessary driver or ask you for the device driver, after the installation of device driver you can install its software if it has.
10. Check device manager if the driver is installed properly, you should see no yellow exclamation on the NIC device.
If everything works out right then you can now close your computer casing and return the screw at the back of your PC.
Summary
In fact, virtually all computers sold in the last 10 years or so have a network interface built-in on the motherboard. However, you may still encounter the occasional older computer that doesn’t have a built-in network interface. The steps we mentioned above may help your computer to access to your network. Installing a network interface card is a manageable task, but you have to be willing to roll up your sleeves.