- Related articles
- All Cisco GLC-LH-SM's information (List price, Specs, Datasheet PDF, Compatibility matrix)
- Applicable to 100BASE-LX10 Standard Optical Transceiver Models
- All Cisco XFP10GLR192SR-RGD's information (List price, Specs, Datasheet PDF, Compatibility
- What is X2 transceiver?
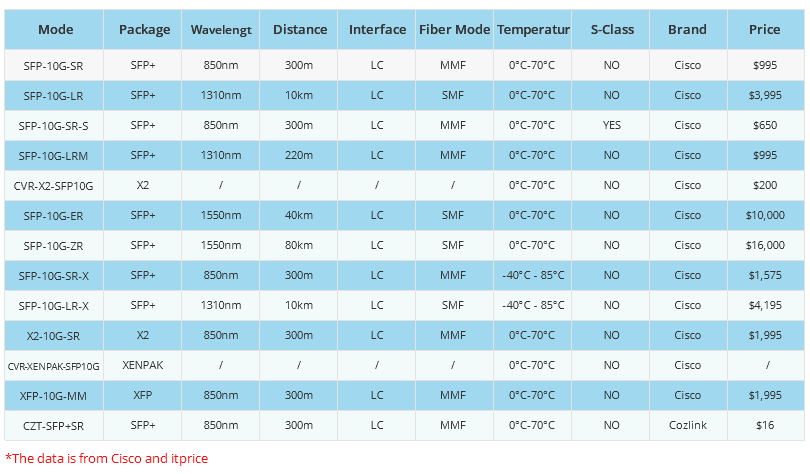
- Cost Effective Compatible Cisco Transceivers
- All Cisco GLC-FE-100ZX's information (List price, Specs, Datasheet PDF, Compatibility matr
- Optical Transceivers for Cisco WS-C3650-24PD-L Switch
- What is the Difference Between GBIC and SFP?
- Optical Transceivers for Cisco WS-C3560C-8PC-S Switch
- Optical Transceivers for Cisco WS-C2960X48LPDL-RF Switch


If you are a network administrator, you may find yourself having to delete configuration on NETGEAR switches occasionally. Configuration can be corrupted or you may need to change the settings to optimize network performance. Whatever the reason may be, it's important to know how to do it safely and efficiently.
In this article, we will go through the steps that you need to follow to delete configuration on NETGEAR switch properly.
I. Solution 1:
Backing Up Your Configuration
Before you begin deleting the configuration on your switch, it’s important to back up your current configuration. This will allow you to restore it to its present state quickly, in case you need to recover any vital settings, or configuration after the reset is complete.
To back up your configuration, connect to the switch via Telnet or a command-line interface (CLI), and enter these commands:
> enable
> configure terminal
# copy running-config tftp://<IP address>/<filename>
Alternatively, you can save a copy of your configuration onto a local device. To do this, replace the tftp option with the startup-config option in the command above. This will save a copy of your current configuration onto the local switch flash.
Now, let's move on to the deletion process.
Accessing the NETGEAR Switch
Before you can delete the configuration on your NETGEAR switch, you need to be able to access it. There are various ways to access the switch, but the easiest method is to use Telnet if you prefer to use the command-line interface (CLI).
Step 1: Launch the Command Prompt
To access the switch via Telnet, you first need to launch the command prompt. On Windows computers, you can do this by searching for "Command Prompt" in the Start Menu search bar. When it appears in the search results, right-click on it and select "Run as administrator."
Step 2: Connect to the Switch via Telnet
Once the command prompt is open, you can connect to the switch via Telnet. Type Telnet, followed by the IP address of the switch in the command prompt. Press Enter and the connection should be made between your computer and the switch.
Step 3: Enter Your Login Credentials
After making the connection, you will be prompted to log in. Enter the switch's username and password when prompted. If you have never logged into the switch before, the default username is admin, and the default password is password.
Deleting Configuration on NETGEAR Switch
Now that you are logged in to the NETGEAR switch, it’s time to delete the configuration. Follow the steps below:
Step 1: Enter the Configuration Mode
To enter configuration mode on the NETGEAR switch, enter the following command:
#configure terminal
Step 2: Delete the Configuration
Once you are in the configuration mode, it’s time to delete the configuration. Enter the following command:
#erase startup-config
You may see a prompt asking if you are sure you want to delete the configuration. Type Y and press Enter to confirm.
Step 3: Save Your Changes
After you have deleted the configuration, enter the following command to save your changes:
#copy running-config startup-config
This command saves the new configuration to the switch's flash memory.
Wrapping Up
Deleting configuration on NETGEAR switch may seem daunting at first, but it's a straightforward process when you follow the correct steps. The most important thing to remember is to back up your current configuration before deleting it. By doing so, you can ensure that you can easily recover the configuration if anything goes wrong.
To back up your configuration, simply enter the copy running-config command, replacing tftp with the startup-config option to save a copy of your current configuration to the switch's flash memory.
Once you're ready to delete your configuration, connect to your switch using Telnet and enter the commands to access the configuration mode, delete the configuration, and save your changes.
Deleting configuration on NETGEAR switch can be a useful skill to have for network administrators and will help ensure that your network is running at its optimal performance.
II. Solution 2:
To restore a smart switch to its factory default settings, use either the Factory Default button or the web management interface. If you lost the password to access the smart switch, you must use the Factory Default button.
Important: Restoring the default settings erases all saved configurations including the password, VLAN settings, and port configurations.
To reset a smart switch using the Factory Default button:
1.Locate the recessed button that is marked Factory Default or Factory Defaults on the back or bottom panel of your device.
Be careful not to mix it up with the Reset button. The Reset button restarts the switch, it does not restore it to factory default settings.
2.Insert a straightened paper clip or a similar device into the hole of the Factory Default button and hold for two to three seconds.
If you press the Factory Default button too long, some switches change to recovery mode, signified by the LED light turning from green to amber. If this happens, power cycle the switch or press the Reset button to reboot the device.
The smart switch restarts in a factory default configuration.
To reset a smart switch using the web management interface:
1.In your web browser address field, enter your smart switch IP address.
For more information, visit What is my NETGEAR Web Managed Plus or Smart Switch Default IP Address?
You are prompted to enter your password.
2.Enter your case-sensitive password and click Login.
If you did not change the default password, the default password is password.
The System Information screen displays.
3.Select Maintenance > Reset > Factory Default.
4.Select the Check this box and click apply below to return all configuration settings to default values check box and click Apply.
The smart switch restarts in a factory default configuration.
III. Solution 3:
FACTORY RESET | NS GEN2 (NETGEAR) SWITCHES
DETAILS
Procedure
Method 1
1.Launch a web browser.
2.In the address field of your web browser, enter the IP address of the switch. The login page displays.
3.Click the Main UI Login button. The main UI login page displays in a new tab.
4.Select Maintenance > Reset > Factory Default. The Factory Default page displays.
5.Select the check box.
6.Click the Apply button. (A confirmation pop-up window displays.)
7.Click the OK button to confirm. The configuration is reset to the QSC factory default settings.
Method 2
To reset switch to factory default settings press Reset button for more than 5 seconds.